

It’s lovely to see celebrated stories from our childhood come to life. Perhaps you read “The Secret Garden” by Frances Hodgson Burnett as a school assignment. Or like me, maybe you saw the 1987 Hallmark film, fell in love with the story and then discovered the book. Maybe you are brand-new to learning about the story because just recently heard about film that will be released later this year.
However you came to discover The Secret Garden, you are likely enchanted by the endearing story and splendor of the garden behind the gate. The restorative powers of gardening are so eloquently embraced in this charming tale.
Inspired by The Secret Garden we’ve partnered with our friends at Oriental Trading to bring a bit of the magic into your home with a Secret Garden Shadow Box Craft.

We might be stuck inside right now, but you can still bring the garden in! This fun, quick and easy craft is family-friendly and only limited by your imagination.
I designed the craft for pre-teens and teens, but it’s suitable for all ages. If you are crafting with little ones, you’ll need to help with cutting and gluing materials (especially if you use a hot glue gun.)
All of the materials and supplies were ordered from and are available at Oriental Trading. (PS: Use code HipHop20 for FREE Shipping through 2/26!)
The only thing I purchased separately is a live air plant as I wanted to incorporate my secret garden shadow box as part of my indoor plant decor. You could also purchase a faux plant to add to your garden if you don’t wish to keep up with tending to a live plant.
Hope you are inspired by this craft and enjoy designing a secret garden of your own!

Secret Garden Shadow Box Craft
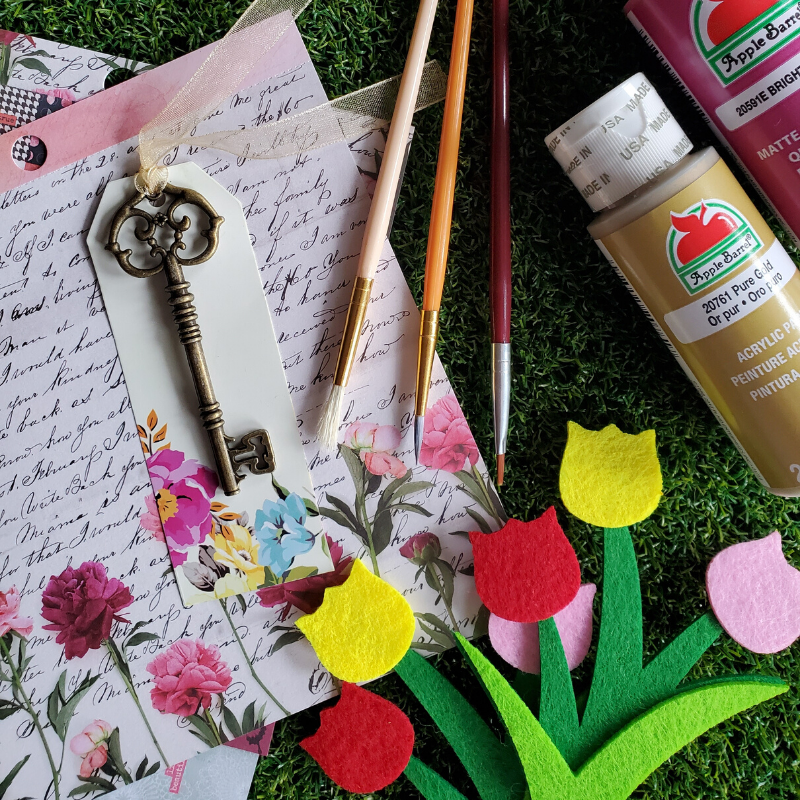
Materials
DIY Unfinished Wood House-Shaped Shadow Box
Patterned Craft Paper (I used some from the American Crafts™ Paper Pad collection)
A key for your secret garden (I used one from Talking Tables Truly Alice Keys & Tags)
Ivy Garland
Felt Tulip Embellishments
Faux Moss Easter Bunnies
Artificial Grass
Acrylic Paint
Paint brushes
Glue
Optional: Air plant or small potted succulent
Instructions
Using your shadow box as a guide, cut out a paper gate (and fencing, if desired) to place in the center bottom of your shadow box. You can use any paper pattern you choose. I opted for a wood pattern for a more realistic “gate” and “fence” look. Behind the fence, I decided to use a floral paper with writing on it to give the illusion of flowers growing behind the fence and add a bit of vintage charm.
If you want to have a faux grass bottom on your shadow box, using your shadow box as a guide, cut a strip of the artificial grass to fit into the bottom of the box.
Paint shadow box in desired color(s). You could paint the entire shadow box green for a garden effect or perhaps give it a distressed wood finish for a farm chic look. Maybe you want to create a fantastical garden instead and use a pink or yellow background or a starry night sky?
I chose to make my shadow box look as if it were a green landscape with a blue sky. To add a little “grass” effect at the edge of the landscape, I used a feathered brush and simply swept it upward with a few strokes to create blades of grass.

After the paint dries on your shadow box, glue gate (and optional fencing) in place at the back of the box (see photos for reference.) Glue faux grass onto the bottom of the box.
Add embellishments as desired to the back wall of the box. I added a button that I had in my sewing stash to act as a handle for my gate.
You can add cotton for clouds, flowers by the fence, or even place your secret garden key on the back wall of the shadow box. You might want to add paper or felt or other embellishments on the roof of the shadow box, too, to create shingles for the house shape. Or maybe you even want to add a space ship in the sky above your garden? Personalize however you see fit!
Now it’s time to add some depth to your project!
For my secret garden shadow box, I glued a faux moss Easter bunny with a felt tulip flower behind it in the right center of the bottom of the shadow box. This left room for my air plant to be placed on the left.

You can add additional flowers, rocks, shells, or even figurines, if desired. Just keep in mind that using items of varying heights works best to give your shadow box more interest and dimension.
When you have everything in place, trim the box with ivy by gluing the xx around the edges. This gives it the real “secret” effect as if you were peering in at the scene through foliage.
I opted to only have the ivy trail over three of the walls of my shadow box (as illustrated.) I first cut a strip of the Ivy Garland to fit the area I wanted to cover and glued the strand in place. I then snipped off a few of the leaves from the leftover strand to fill in spaces so I had denser foliage. This look appealed to me the best. Use your judgement in how sparse or dense you wish your ivy strand to be.

If you haven’t glued your key in place yet, affix to the outer edge of the box. Or affix to the roof, the bottom edge or wherever you wish to display your key to your secret garden on your shadow box. Again, it’s a matter of preference.
If you wish to hang the box on a wall, now is the time to affix wall hanging material to the back.
Viola! You have your own secret garden to display in your home!
I’d absolutely love to see what you create! If you make a Secret Garden Shadow Box Craft, please snap a photo and tag me on social. Stay well, my friends!